Wednesday, January 14, 2009

Vegetarian Meatloaf

Source: Branny Boils Over
Made by: Cathy

On the cooking message boards I frequent, great recipes are always being shared. One of the ladies shared her recipe for vegetarian meatloaf.

Gary and I have talked about having vegetarian night at least once a week, but it never happens. We eat plenty of vegetables, but there’s always a meat dish to accompany it. We still cheated tonight and had stirfry along with the meatloaf, but it is a great alternative to meat. Granted, it’s not exactly the same as meatloaf, but there was enough flavors going on that you wouldn’t even miss the meat.

Vegetarian Meatloaf

Ingredients:
1 scant cup brown lentils, rinsed
2 cups water
1 small onion
1 egg white
¾ cup tomato or spaghetti sauce
1 tsp basil
1 Tbsp dried parsley
1 tsp salt
1 tsp garlic powder
½ cup oatmeal
½ cup bread crumbs (I used Italian style)

2 Tbsp nutritional yeast & 1 Tbsp dissolved flax seed (ground)
OR
½ cup cheddar or mozzarella cheese

Directions:
1. Boil 1 scant cup brown lentils in 2 cups water until tender. Add more water if necessary. Mash. I ran it through my food processor for a few seconds. It should not be too soupy (but not too thick, either) after mashing. Kind of like sloppy Joes.

2. Dice 1 onion. Beat in 1 egg white. Mix in tomato sauce, basil, dried parsley, salt, and garlic powder. Add 1/2 c oatmeal and 1/2 c bread crumbs to bowl. Mix. Add mashed lentils. Mix in nutritional yeast/flax seed OR 1/2 cup of cheese.

3. Spread mixture into greased loaf pan and bake covered at 350° for 45 minutes. Run a knife along the edge of the loaf, let cool 5 minutes, and then turn out onto a greased baking sheet.

Meatloaf, before baking

4. Top with your favorite glaze (tomato sauce + brown sugar, bbq sauce, nothing) and return to oven until warmed. Let set 5-10 minutes before slicing.

I topped it with the leftover spaghetti sauce and spread it like frosting before I put it back in the oven. I was having way too much fun making it!

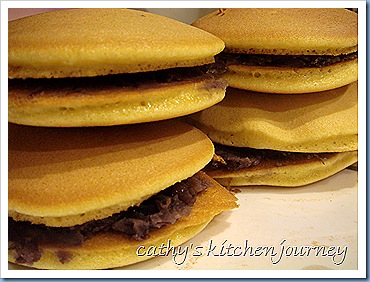
Dorayaki Cake (Japanese Pancake)

Adapted from: Nintendo DS – Personal Trainer Cooking, Ezine Articles
Made by: Cathy & Gary

So, Gary got the DS Personal Training game. He looked through and found a recipe he wanted to make. We've eaten the Japanese pancakes fresh from the Japanese supermarket, as well as packaged from the Chinese grocery stores. Fresh is always better.

So Gary went and bought the beans, he made it as instructed…it turned out fine. The next step was to make the pancakes. I ended up making it because, of course he initially thought he needed a CUP of BAKING POWDER! Give him a stovetop, and he’s fine, but baking is not his forte, so he handed it over to me.

I started out with the original recipe from the DS, and from reading it, I knew it was already a disaster in the making. First of all, there was too much flour to liquid ratio. The batter ended up thick and did not pour well out of the ladle. It was a mess! I was really annoyed and yelled at him the whole time I was mixing it. The pancakes turned out thick, hard, overcooked on the outside, and undercooked on the inside. Into the garbage it went.

So, of course, we couldn't let the beans go to waste. We left it in the fridge to try again the next day.

I googled the recipe for the cake. I found several, but went with one that used about the same ingredients as the DS version, but with much more accurate measurements. The result? Edible pancakes!

Dorayaki cake

Ingredients:
Bean Paste:
2/3 cup azuki beans
2/3 cup white sugar

Pancakes:
3 eggs
2/3 cup of white sugar
1/2 teaspoon of baking soda
1/4 cup of water
1 cup of all purpose flour – sifted

Directions:
Preparing the bean paste:
1. Wash the azuki beans and soak overnight.

2. Transfer the beans to a saucepan. Add enough water to cover and bring to a boil over high heat. Once the water comes to a boil, pour the water out, then replace with fresh water. Place over high heat again and bring to a boil. Turn the heat down a little and simmer for 15 minutes. Turn the heat down low and simmer for 45 minutes, cooking off the water until it barely covers the beans.

3. Add 2/3 cup sugar, stir well, then simmer until almost all the water has completely evaporated. Continue to simmer and mix the beans thoroughly over medium heat. Once the mixture takes on a glossy sheen, turn off the heat.

Red Bean Paste

Preparing the pancakes:
1. Whisk together the eggs and sugar.

2. Dissolve the baking soda into the water. Add the water into the egg mixture.

3. Gradually sift the flour into the egg mixture while continuing to whisk.

4. Heat a skillet or a hot plate and put a little bit of oil into it. I used my indoor griddle, so I sprayed a little nonstick spray.

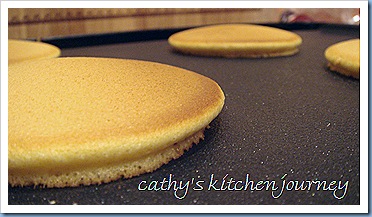
5. Scoop about half a ladle of batter into the skillet to form a small pancake (about 3" in diameter).

6. Turn the pancake over in the pan when bubbles begin to form and appear of the surface of the cake. Repeat this process to make about 16 pancakes.

pancake

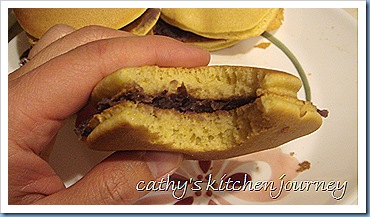
7. Let the pancakes cool. Scoop about a tablespoon of the bean paste onto the flat side of the pancake, then sandwich with another pancake.

big bite

This recipe makes about 8 dorayaki cakes. You will need a double batch to use up all the bean paste. You can also make these bigger than the size indicated. We definitely spoiled our dinner by eating more than one of these.

Tuesday, January 13, 2009

Marbled White Chocolate Cheesecake

Ok, this post is long overdue. Mainly because of the lack of a picture.

I made this cheesecake for a Christmas celebration over at a friends’ place. It is now almost mid-January and I still haven’t posted this. On Christmas day, we rushed out of the house with presents and cake in tow, and of course I forgot to bring my camera along. Of course, Gary hates it when I go back home to pick up something I forget…usually it’s my phone, so I didn’t bother. Someone else was bound to have a camera. I’ll just use theirs. I still haven’t gotten the picture yet. It’s no biggie. I’ll just use Kraft one as a place holder for now. Once I get it, it will be updated.

This was the 2nd cheesecake I have attempted to make. It was good, but not as creamy as I hoped. It could have also been the quality of chocolate I used, but everybody else seemed to enjoy it.

white chocolate marble cheesecake updated 12/9/09 with my own picture!

Marbled White Chocolate Cheesecake
Adapted from: Kraft

Ingredients:
18 chocolate Oreo cookies, crushed
3 Tbsp. butter or margarine, melted
3 pkg. (8 oz. each) PHILADELPHIA Cream Cheese, softened
1/2 cup sugar
1/2 tsp. vanilla
3 eggs
2 squares BAKER'S Semi-Sweet Chocolate, melted (I used 2 tablespoons melted semi-sweet morsels)
1 pkg. (6 squares) BAKER'S White Chocolate, melted (I used 1 bag of white chocolate morsels)

Directions:
1. Preheat oven to 350°F if using a silver 9-inch springform pan (or to 325°F if using a dark nonstick 9-inch springform pan). Mix crushed wafers and butter. Press firmly onto bottom of pan. Bake 10 minutes.

2. Beat cream cheese, sugar and vanilla in large bowl with electric mixer on medium speed until well blended. Add eggs, 1 at a time, mixing on low speed after each addition just until blended. Remove 1 cup of the cream cheese mixture; place in small bowl. Add melted semi-sweet chocolate; stir until well blended. Add melted white chocolate to remaining cream cheese mixture; mix well. Spoon semi-sweet and white chocolate mixtures alternately over crust. Swirl with knife to marbleize.

3. Bake 40 minutes or until center is almost set. Run small knife or spatula around side of pan to loosen cake; cool before removing rim of pan. Refrigerate 4 hours or overnight. Garnish as desired. Store leftover cheesecake in refrigerator.

I used a 10” springform pan because that’s the only size I have. I baked it for 35 minutes and left it in the oven to set for a couple of hours before putting it in the fridge. Next time if I’m using a 10” pan, I will bake it for less time and let it finish setting in the oven.

Monday, January 12, 2009

Split Pea Soup

Adapted from: Ina Garten, Food Network
Made by: Cathy

Growing up, I’ve never been a fan of peas. Whenever my mom made fried rice, she would always scoop a bowl out for me, sans peas, then added peas for everybody else. That’s how much I refused to eat peas. My brother on the other hand, loves peas, and cannot get enough of it!

Since living with Gary, we’ve adapted to each other’s tastes, and I’ve grown to tolerate peas. A couple of weeks ago, I saw a recipe for pea soup that took 10 minutes to make. It was for some diet/weight loss show. Since I was channel surfing, I didn’t get the name of the show, but it looked pretty simple.

My quest for pea soup started! Most of the recipes I found was for split pea soup, so I tried that instead. This definitely didn’t take 10 minutes, but it was good. Gary liked it, and he even compared it to Au Bon Pain soup…I take that as a compliment.

The recipe called for 8 cups of stock, so I halved the recipe. We both agreed it was a bit salty for our taste, so I ended up adding an extra cup of water. It may be the stock we used, but I will use less salt next time.

split pea soup

Ingredients:
1 small yellow onion, chopped
1 teaspoon minced garlic
2 tablespoons olive oil
1/2 teaspoon dried oregano
3/4 teaspoons kosher salt
1/2 teaspoon freshly ground black pepper
2 medium-diced carrots
2 medium-diced potatoes
1 stalk celery diced
1 1/4 cup dried split green peas (half a bag)
4 cups chicken stock or water (one carton)
1 cup water

Directions:
1. In a small stockpot on medium heat, sauté the onions and garlic with the olive oil, oregano, salt, and pepper until the onions are translucent, 10 to 15 minutes.

2. Add the carrots, potatoes, split peas, chicken stock, and water.

3. Bring to a boil, then simmer uncovered for 60 minutes. Skim off the foam while cooking. Stir frequently to keep the solids from burning on the bottom. Taste for salt and pepper. Serve hot, with bread or crackers.

Sunday, January 4, 2009

Chicken and Spinach Pizza

Adapted from: Allrecipes.com
Made by: Cathy

I've been meaning to make pizza for a while now. I was a little intimidated at first because I haven’t had much experience making yeast bread. This was one of the easier recipes I've tried though. There was minimal hands on time, more waiting time than anything. The crust was nice and crispy with a chewy center. The original recipe probably made a really large pizza, or 2 smaller ones. It was just the 2 of us, so I halved the recipe.

This was a great way to use up my leftover chicken from the night before.

What’s funny is that first thing that Gary said after he took a bite was “Mmm, this taste like real pizza!” Um…I think that was the point!

chicken spinach pizza

Ingredients:
For the crust:
1 1/8 teaspoons active dry yeast
1/4 teaspoon brown sugar
3/4 cups warm water (110 degrees F/45 degrees C)
1/2 teaspoon salt
1 tablespoons olive oil
2 cups all-purpose flour

1 tablespoon olive oil
1 teaspoon garlic powder
1 teaspoon onion powder
cornmeal for dusting

For the topping:
1 cup pizza sauce (I used jarred pasta sauce)
1 cup low moisture shredded mozzarella cheese (or more if desired)
1 cup cooked chopped chicken
1 10 oz package frozen spinach, thawed and drained

Directions:
1. In a large bowl, dissolve the yeast and brown sugar in the water, and let sit for 10 minutes.

2. Stir the salt and 1 tablespoon of oil into the yeast solution. Mix in 1 cup of the flour.

3. Turn dough out onto a clean, well floured surface, and knead in more flour until the dough is no longer sticky. If using the dough hook of a mixer, gradually pour in the rest of the flour as the mixer is running on low speed. Place the dough into a well oiled bowl, and cover with a cloth. (I used saran wrap and a paper towel. Let the dough rise until double; this should take about 1 hour. Punch down the dough, and form a tight ball. Allow the dough to relax for a minute before rolling out.

4. While the dough is rising, preheat oven with the pizza stone inside to 425° F (220° C). If you are baking the dough on a pizza stone, you may place your toppings on the dough, and bake immediately. If you are baking your pizza in a pan, lightly oil the pan, and let the dough rise for 15 or 20 minutes before topping and baking it.

5. Dust parchment paper with cornmeal. Roll out your dough to about 12" in diameter. Mix together the remaining oil, garlic powder, and onion powder. Brush the oil onto the crust. Pour the pizza sauce in the middle and spread in a circle with the ladle. Layer half the spinach on the crust. Layer half the chicken, then remaining spinach and chicken.

6. Transfer the pizza to the baking stone along with the parchment paper. Bake pizza in preheated oven, until the cheese and crust are golden brown, about 15 to 20 minutes.

slice

The pizza was great for my first time making pizza. Next time, I will probably add some Italian seasoning to the crust. I meant to do that too, but I forgot. I can’t wait to try different toppings.