Friday, July 31, 2009

Shrimp Omelet

This past week, we didn’t do a full grocery shopping trip. That meant, we didn’t have as many fresh ingredients in the fridge as I wanted. We always think about getting takeout as well, but in an effort to save money, I end up making something with ingredients I have on hand.

Gary’s mom makes something similar to this. I think my mom does too. We were discussing today and wondering why our moms cook so well. We chalk it up to the many years of experience they have. Hopefully, in 10 years, that will be the case with me. A side thought: is it me or does it seem like moms never seem to need a recipe for anything?? They seem to everything ingrained in their brains.

Anywho, I checked the freezer for something. Our freezer is packed, BTW. Everything in there needed time to defrost…except for the shrimp! That takes just minutes to defrost! So this was how this recipe was born.
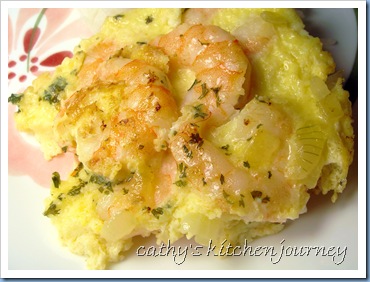
shrimp omelet

Shrimp Omelet

Ingredients:
~20 medium shrimp, peeled and cleaned
1 TBSP margarine (or butter)
1-2 TBSP oil
1 small onion, diced
5 eggs, beaten
salt
dried parsley
garlic powder

Directions:
Peel and clean the shrimp. Set aside

In a large skillet, melt margarine over medium-high heat. Add oil. Add in diced onions and cook until they turn clear.

Add shrimp and cook for 3-5 minutes until mostly pink. Shake the pan to form an even layer of shrimp. Pour eggs over the shrimp. Add salt, parsley and garlic powder over the top of the eggs. I didn’t measure. I just shook it over the top of the eggs.

Reduce temperature to medium-low heat, cover and allow the eggs to cook through. If possible, flip the whole omelet over and cook for another2-3 minutes until eggs are no longer runny. Of course, I couldn’t flip the whole omelet. I cut it into quarters and flipped each section.

Transfer to plate and enjoy.

Yes, I understand it might look gross, but it was pretty tasty.

This will also be submitted to the NTTC#5 July 2009 Challenge.

Wednesday, July 29, 2009

Mango Sorbet

I’m not a huge fan of mangoes, however Gary loves it. We first saw mango sorbet at Trader Joes. We bought it, and it was done in a few days. I didn’t have any of course. The flavor doesn’t appeal to me.

A few months ago, I bought a bag of frozen mangoes on sale at the supermarket. I intended to replicate the TJ’s sorbet when I found the right recipe. I saw this recipe and decided to try it. After Gary’s first taste from the spatula, he loved it! He said it’s even better than the TJ’s one. Of course! It’s homemade!

Now, since I didn’t have any of it, I’m just going to have to take his word on it. I only had a small taste, but since I don’t like mangoes, my opinion doesn’t count.

My changes with the recipe are indicated below.

mango sorbet

Mango Sorbet
adapted from: The Ultimate Ice Cream Book

Ingredients:
1 cup sugar
3/4 cup water
2 ripe mangoes, about 1/2 lb each (I used a 1 lb bag of frozen mangoes)
juice of 1 lime (I omitted)
splash of vodka (my addition, optional)

Directions:
Combine the sugar and water in a small saucepan . Stir the mixture until the sugar dissolves completely and the syrup is clear. Remove from the heat and allow to cool to room temperature.

Peel the mangoes and cut as much of the fruit as you can away from the pits. If using the frozen mangoes, allow to thaw while the syrup is coming to room temperature, about 30-45 minutes.

Combine all the ingredients in a blender or food processor. Blend until completely smooth, about 30 seconds. Cover and refrigerate until cold or overnight. (Because I used frozen mangoes and it was slightly frozen, the mixture was cold enough to go directly into the ice cream maker.)

Stir the chilled mixture, then freeze in your ice cream machine according to the manufacturer’s instructions. When finished, the sorbet will be soft but ready to eat. For firmer sorbet, transfer to a freezer save container and freeze at least 2 hours.

Monday, July 27, 2009

Dried Apple Chips

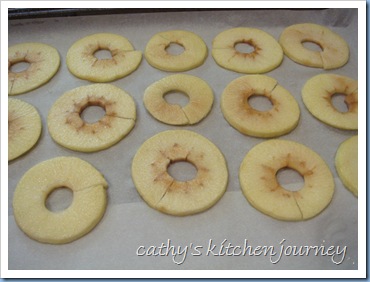
I can’t really call these chips, because they didn’t really dry to a crisp. However, they had great flavor, a great chewy texture, and tasted just like dried fruit snacks you would get at the store!

I first saw this recipe a while back when it was first featured in Tastespotting. I love eating dried fruit. Dried apples and bananas were always my favorites.

The original recipe called for coring the apples using a melon baller (which I didn’t have), and slicing with a mandolin slicer. I had the slicer, but I thought it would be easier to use the all in one apple/corer/slicer I had, even though the slices would be thicker.

apple chips

Dried Apple Chips
adapted from: Apple Pie, Patis, & Pâté

Ingredients:
1 cup (7 ounces / 200 grams) granulated sugar
3/4 cup + 2 tablespoons (7 ounces / 200 grams) water
2 green apples, preferably a tart and crisp varietal such as Granny Smith (peeling optional)

Directions:
In a small saucepan, heat the water and sugar over low heat until the sugar is completely dissolved.

Cut the apples in half crosswise and core with a melon baller. Using a mandolin slicer, slice the apples crosswise into paper-thin rounds. (I sliced/peeled/cored with my apple peeler/slicer/corer.)

apple corer slicer peeler

The rings will be connected. Slice it down on one side with a knife. Voila, rings!

apple rings

Drop the sliced apples in the syrup immediately and heat gently for about 2 minutes. Remove from the heat and let the sliced apples cool in the syrup, at least 30 minutes.

Preheat the oven to 175ºF / 80ºC. (My oven is not digital. I set it to below “warm” setting and relied on my oven thermometer.)

Carefully remove the apple slices from the syrup and place gently on sheet pans lined with silicone mats or parchment.

apple rings on parchment

Dry in the 175ºF / 80ºC oven until crisp, at least 2 hours. (Because my slices were thicker, it was in the oven for about 4 hours.)

apple chips stack

Note: After about 4 hours, I sort of gave up. It was way too long for something to be in the oven! I took it out, let it sit at room temperature a bit. It dried up a bit more, but it was still wasn’t crispy. That was just a minor setback though. It still had a great flavor. It was a bit sticky from the sugar, and it was chewy. I will probably try this again with a mandolin instead.

Monday, July 20, 2009

Kiwi Sorbet

This past weekend was the the first hot and humid day so far this summer. We haven't had any scorchers lately, but this was the type of weather where you want to lay down, have plenty of cold drinks or just have something cold and refreshing. It was the perfect time to whip out the ice cream maker and use up the kiwis I bought.

I first saw this recipe in The Ultimate Ice Cream Book, and thought it was something I had to make. The original recipe called for lime juice as well to the recipe, but I didn't have any, so I omitted it. Also, as I look at the recipe again, I totally read the recipe wrong! For some odd reason, I thought it said 1/3 cup plus 2 TBSP sugar…so that’s all I added. However. It tasted fine to me! So, it all depends on the ripeness of your kiwi! Mine was super ripe, so it was a lot sweeter. Remember to taste the kiwi to gauge the amount of sugar you use.

Let me tell you, this was so light, tart and refreshing! I love tart fruits and this sorbet is something you can't buy at the supermarket...or at least, I've never seen this flavor in my supermarket.

kiwi sorbet

Kiwi Sorbet
adapted from: The Ultimate Ice Cream Book

Ingredients:
3/4 cup water
3/4 cup plus 2 TBSP sugar (use as little or as much as you need…I used way less than this)
1 1/2 lb kiwi (about 6-8 medium)
1/2 tsp vanilla extract
juice of 1 lime (I omitted)

Directions:
Combine the sugar and water in a small saucepan and over low heat. Stir until the sugar dissolves. Turn up the heat and boil the syrup for 1 minute. Remove from heat and let the syrup cool to room temperature.

Peel the kiwis and cut into quarters. Place the fruit in a blender with the cool syrup, lime juice, and vanilla. Blend on low until the mixture is smooth, about 1 minute. Refrigerate until cold or overnight.

Stir the chilled mixture, then freeze in 1 or 2 batches in your ice cream machine according to the manufacturer’s instructions. When finished, the sorbet will be soft but ready to eat. For firmer sorbet, transfer to a freezer-safe container and freeze at least 2 hours.

Thursday, July 16, 2009

Chicken Mushroom Romaine Lettuce Stack

Or you can call this a romaine lettuce “lasagna”. Whatever you call it, it will still tasty the same…delicious!

Earlier in the week, I purchased a family size bag of romaine lettuce because it was on sale. Of course, there’s a certain amount of salads I can eat before I get sick and tired of it. I wanted to come up with something else to use up with the chicken I had in the fridge, so I thought about the cabbage wraps my sister makes. She uses ground pork and fishcakes…but of course Gary and I don’t eat pork.

I called her and I asked her what she added in her recipe, and as we were talking, I came up with this idea. Since romaine is fairly hard to roll unless I wilt it first, why not layer it like a lasagna?

So this is what spawned from that idea.

chicken shitake romaine lasagna stack

Chicken Shitake Mushroom Romaine “Lasagna” Layers

Ingredients:
1 lb boneless chicken thighs, ground (or use ground chicken)
8 dried shitake mushrooms (or use fresh)
2 scallions sliced
2 Tbsp soy sauce
1 Tbsp mirin
1 tsp salt
dash of white pepper
1 bunch romaine hearts
cooking spray

Directions:
Soak dried mushrooms in cold water for about 20 minutes, or until softened.

Meanwhile, trim excess fat from chicken thighs and cut into 1” cubes, add to food processor. Squeeze water from mushrooms, break off mushrooms stems, discard stems, and add the mushroom caps to the food processor. Pulse both items in food processor a few times until ground.

Mix in scallions, soy sauce, mirin, salt and pepper until thoroughly combined.

ground chicken mushroom mixture

Spray cooking oil in a 9” glass pan, line the bottom with a layer of the large leaves of the romaine lettuce. At this point, you can also add another layer of the little pieces that are from the middle of the heart.

romaine layer

Spread half the chicken mixture on the romaine. Repeat with another layer of romaine, then the rest of the chicken mixture, then top with the last layer of romaine.

chicken romaine stack uncooked

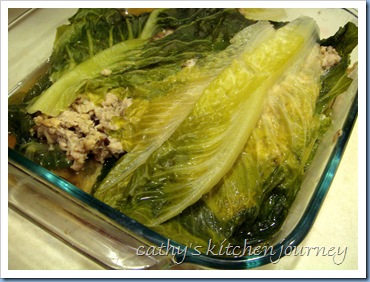
Steam for 20 minutes, or until chicken is cooked through.

chicken romaine stack cooked

Cut into pieces, and enjoy!

chicken romaine lasagna slice

This tasted great! This also reminded me of dumpling filling, so I might even use it for that!


This recipe is being submitted to: original recipe logo