Monday, July 11, 2011

Rosemary Bread (bread machine)

A little while back, I bought a bread machine on clearance. It was $20 and too good of a deal to pass up. Now, I know some people think it's just a uni-tasker and not worth it since it takes up too much space. I think it is worth it because we want homemade bread, but I'm not one of those who likes to knead bread or wait for hours for dough to rise then punching it and then doing some other stuff to it...you get my point right? This is so much easier since I just measure out all the ingredients and I let it do the work for me.

I've made a few loaves now, and Gary really likes the basic white bread that I've made with coconut oil. He actually ate half the loaf in almost one sitting, and the whole loaf was done within a day.

While I've been testing it out, I stumbled upon a few hiccups (like forgetting to put the dough hook in before starting it!). I hope to use this some more in the next few months and get a few recipes on the blog.

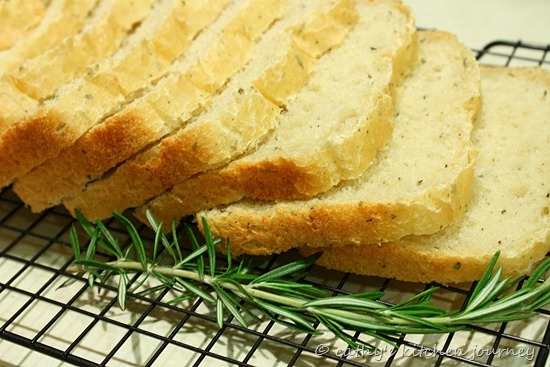
rosemary bread

One of the recipes I tried out was this rosemary bread. When I saw this post, I knew I wanted to try it out, but I wasn't sure if Gary would go for it. To my surprise, he thought it looked good too! All I was missing was the rosemary, so once I got that, I was good to go. I'm glad I decided to make this. This would go great with some olive oil or paired with an Italian dinner. It will probably work well as rolls as well.


Rosemary Bread (bread machine)
adapted from: So Tasty, So Yummy, originally from allrecipes.com

ingredients:
1 cup warm water
3 TBSP olive oil
1 ½ tsp white sugar
1 ½ tsp salt
¼ tsp ground black pepper
1 TBSP fresh rosemary, minced (about 2-3 sprigs)
pinch of each: basil, oregano and marjoram
2 ½ cups bread flour
1 ½ teaspoons instant yeast

directions:
Place ingredients in the pan of the bread machine in the order recommended by the manufacturer.

Select white bread (basic) cycle and one pound loaf. Press start.

Allow to cool for 1 hour before slicing.


Friday, July 8, 2011

Key Lime Bars

For the July 4 holiday, I was stumped when I was deciding on a dessert. I saw these and wanted to make it, but it wasn't dairy free, thus me making the brownies. However, I really wanted to make these since they looked so good, so I ended up making both.

key lime bars

I'm glad I made these, because they turned out beautifully. I'm not really a heavy dessert person, so these were still light from the citrus even though there was so much butter and eggs. These were a hit at the bbq as well, and I heard it was great with vanilla ice cream!

Also, I love key lime pie, so I thought key lime juice would be great instead of lemon. Since I'm in NY, key limes are hard to get by. I used some bottled juice I picked up from Fairway, and it worked wonderfully.


Key Lime Bars
adapted from: allrecipes.com via I was Born to Cook

ingredients:
crust:
1 cup butter, softened
1/2 cup white sugar
2 cups all-purpose flour

batter:
4 large eggs
1 1/2 cups white sugar
1/4 cup all-purpose flour
1/4 cup key lime juice

directions:
Preheat oven to 350° F (175° C).

In a medium bowl, cream the butter and sugar. Mix in 2 cups of flour. Press into the bottom of an ungreased 9x13 inch pan.

Bake for 15 to 20 minutes in the preheated oven, or until firm and golden. In another bowl, whisk together the remaining 1 1/2 cups sugar and 1/4 cup flour. Whisk in the eggs and lime juice. Reserve 1 cup of batter for dyeing (eyeball it). This is totally optional. You can pour all the batter over the crust without the marbling effect.

Pour batter over the baked crust.

Dip a fork or small whisk into green gel food coloring or add a few drops of liquid food coloring. Whisk into the reserved batter. Pour over the pan to create lines in the middle (it's ok if it's messy). Using a toothpick, drag through the batter to create a marbled look.

Bake for an additional 20 minutes in the preheated oven.

Remove from oven and let cool completely before cutting. The bars will firm up as they cool.

Makes 24 squares.

Monday, July 4, 2011

Star Shaped Brownies with Coconut Milk Ganache

Happy 4th of July! What are your plans today? I'm spending time with my family and having a bbq.

If you're still looking for a dessert recipe, look no further! These cute brownie stars are easy to make and festive for the holiday. I came up with this when I was at a lost of what to make that was dairy free. I decided to go back to a tried and true recipe and snazz them up.

brownie stars

I coated the white and blue brownies with candy melts (added food coloring to make blue since I didn't have blue melts). I had red candy melts as well, but since the candy melts aren't dairy free, I made a coconut milk ganache and topped it with red sugar. I think they turned out pretty nice if I don't say so myself!

I didn't use up all the ganache, so I see truffles in the future!


Star Shaped Brownies with Coconut Milk Ganache
adapted from an existing recipe

ingredients:
3/4 cup unsweetened cocoa powder
1/2 tsp baking soda
2/3 cup canola oil, divided
1/2 cup boiling water
2 cups white sugar
2 eggs
1 1/3 cups all-purpose flour
1 tsp vanilla extract
1 TBSP espresso powder
1/4 tsp kosher salt
1 cup semi-sweet chocolate chips (or carob chips)

recipe coconut ganache (below)

directions:
Preheat oven to 350° F (175° C). Line an 11x17 rimmed cookie sheet with foil. Spray with baking spray.

In a large bowl, stir together the cocoa and baking soda. Add 1/3 cup vegetable oil and boiling water. Mix until well blended and thickened. Stir in the remaining 1/3 cup oil, sugar, then eggs one at a time. Add the flour, vanilla and salt; mix just until all of the flour is absorbed. Add in the espresso powder. Mix until combined. Stir in chocolate chips. Spread evenly into the prepared pan.

Bake in the preheated oven for 20 to 25 minutes, or until a toothpick inserted into the cake comes out clean. Let cool in pan.

Lift brownie out of pan using the foil. Cut into star shapes using a cookie cutter. You may need a knife in case the cookie cutter doesn't go all the way through.

decorations:
Melt candy melts per the package directions. Spread the coating on top of the brownie. Let harden in the fridge and store at room temp after hardening. I did this because my home is warm and it didn't set right at room temperature.

for the ganache:
1 cup coconut milk
1 cup semi sweet chocolate chips
1 tsp vanilla extract

Bring 1 cup of coconut milk to a boil. Remove from heat once boiling.

Place chocolate chips in a medium heat proof bowl. Pour boiling milk over chocolate chips. Let sit for one minute, then whisk until smooth. Stir in vanilla.

Cover with saran wrap, making sure it touches the surface so a skin doesn't form. Allow to cool at room temperature.

Dip one side of the brownie into the ganache and add red sugar. Cool in fridge until set. Store at room temperature.

Makes about 16 brownies (depending on your cookie cutter size) with leftover scraps of brownies.

Thursday, June 16, 2011

Breakfast Muesli with Raisins and Flaxseed

meusli

This past week, I decided to participate in a recipe swap with a few ladies from the message boards I frequent.  I wasn't sure what I was going to end up getting, but I did request something dairy free to be adaptable for Gary.

This week's theme was breakfast items. I shared the strawberry pancake recipe that Gary loved so much! I received this breakfast muesli. I was concerned when I got this, because I've actually never seen Gary eat oatmeal. I've always been the oatmeal/yogurt/cereal type breakfast person, and he was the meat and potatoes type. Little did I know, his dad used to make oatmeal with eggs for him all the time! I also love how this was prepped and left alone overnight, so it was great when we were rushing out the door the next day!

I originally started out to halved this recipe since we were going to be out of town for a few days. I accidentally poured too much maple syrup in, so I ended up making the full amount. Glad I did, because we actually loved it and ate quite a bit of it in one sitting on it's own.

I did have a few adaptations. I omitted the wheat germ since I didn't have any on hand. I subbed the cranberries with these giant plump raisins I had, and I ended up using the quick oats since it was all I had. I thought I had regular, but I was mistaken. Nonetheless, it worked out fine. I also used almond milk to keep it dairy free.

Check out Taste of Home Cooking for the entire recipe swap round up!

Muesli with Raisins and Flaxseed
adapted from: Baby Food Scoops

ingredients:
2 cups rolled oats (not quick-cooking)
1/2 cup dried cranberries (I used raisins)
1/3 cup wheat germ (I omitted)
1/2 cup ground flaxseed
1/4 cup maple syrup (may alternatively use agave nectar or sorghum)
1/2 teaspoon ground cinnamon
1 ½ teaspoons vanilla
3 cups milk (I used almond)

For serving: yogurt, pumpkin seeds, sunflower seeds, chia seeds, chopped nuts (pecans, almonds, walnuts), fresh fruit

For drizzling: maple syrup or agave nectar

directions:
Combine first seven ingredients (through vanilla) in large bowl.

Pour milk over mixture, stirring to combine.

Cover and chill at least 4 hours (or overnight).

to serve:
Place yogurt in a bowl or custard cup.

Top with oat mixture and add desired toppings.

Drizzle with additional maple syrup or agave nectar, if desired.

Monday, June 6, 2011

Chicken Katsu (Japanese Fried Chicken)

chicken_katsu

We recently got new smartphones and we were playing around with it. I downloaded the allrecipes dinner spinner app and showed it to Gary. He immediately started playing around with it and was amazed! He bookmarked a few recipes to try, and this was the first that he wanted to make since it seemed simple enough.

It was indeed simple, and tasty…but I’m a sucker for anything fried! The only thing we would change about this would be the tonkatsu sauce that we made. We found one on All Recipes as well (mentioned in the comments of this recipe, but it ended being totally inedible. Since we were fine with it plain, we omitted the sauce. We halved this recipe to feed the two of us.


Chicken Katsu
adapted from: allrecipes.com

ingredients:

2 skinless, boneless chicken breast halves - pounded to 1/2 inch thickness
salt and pepper to taste
2 tablespoons all-purpose flour
1 egg, beaten
1/2 cup panko bread crumbs
1 cup oil for frying, or as needed

directions:

Season the chicken breasts on both sides with salt and pepper.

Place the flour, egg and panko crumbs each into separate shallow dishes. Coat the chicken breasts in flour, shaking off any excess. Dip them into the egg, and then press into the panko crumbs until well coated on both sides.

Heat 1/4 inch of oil in a large skillet over medium-high heat. Place chicken in the hot oil, and cook for 3 or 4 minutes per side, or until golden brown. Mine were a bit thicker, so I cooked a little longer, about 5 minutes per side.

Transfer to a paper towel lined plate to soak up the oil. Slice and serve over jasmine rice and top with tonkatsu sauce (optional).


chicken_katsu1