Friday, November 28, 2008

Chinese Turnip Cake

Adapted from: Appetite for China
Made by: Cathy

Turnip cake (law bok gow) is one of my favorite things to get when I go for dim sum. My mom has always made a variation with taro, but never with the white turnip (daikon). My aunt always made it for Chinese New Year every year, but I never attempted to make it myself.

I also had a couple of bags of white rice flour from Gary's gluten free days. I needed a recipe to use up the flour, so this recipe was perfect.


Ingredients:
3 1/4 cups rice flour
8 dried shiitake mushrooms
1/2 cup Chinese dried shrimp
3 Chinese sausages
1 large Chinese white turnip, about 2 pounds
3 tablespoons peanut or vegetable oil
2 teaspoons Shao Hsing rice cooking wine
2 teaspoons dark soy sauce
1 teaspoon salt

Directions:
1.In a large heatproof bowl, combine rice flour and 2 cups of water. Mix well until the mixture is smooth and velvety, and set aside.

2. In a small bowl, soak shiitake mushrooms in about 1/2 cup of cold water for 30 minutes to soften. In a separate small bowl, do the same with the dried shrimp.

3. Meanwhile, bring water to boil in a small pot. Place Chinese sausage in the pot and cook for 3 to 4 minutes to soften. Remove from heat and pat to dry. Peel off the skin of the sausage. Finely chop and set aside.

4. Once the shiitakes are done soaking, remove from water, squeeze out excess water, finely chop, and set aside. Remove shrimp from water, finely chop, and set aside.

5. Peel the turnip, and cut into 1/2 inch thick slices. Then cut slices into strips about 2 inches long. Set aside.

6. Heat 3 tablespoons of oil in a wok. Add shrimp and mushrooms and cook until fragrant, about 3 minutes. Add the cooking wine and soy sauce and stir until the shrimp and mushrooms are well-coated. Add the Chinese sausage, cook for another 1 to 2 minutes, then remove from heat and set aside.

7. In the same wok, toss in the turnip strips and stir-fry for 2 to 3 minutes, adding a bit more cooking oil if necessary. Then pour in 1 cup water, cover the wok, and let the turnip steam for 10 to 15 minutes until just cooked. Drain the liquid from the turnips. Pour the hot turnips into the bowl with the rice flour mixture and mix thoroughly, until the turnips are well-incorporated into the mixture. Add the sausage, shrimp, mushrooms, and salt. Stir until evenly distributed. Pour the resulting mixture into a round 10-inch cake pan and smooth out the top.


8. Steaming: Bring water to boil in a large steamer big enough to fit the cake pan. (Unless your pan is part of a metal steamer set, in which case the pan should fit right in.) Carefully place the pan into the steamer, cover, reduce heat to medium-low. Steam 1 hour, or just until cake is set and is firm to the touch. Check the water level regularly and replenish, if necessary, with boiling water. Carefully remove the pan from the steamer and allow to cool on a rack for about 1 hour.


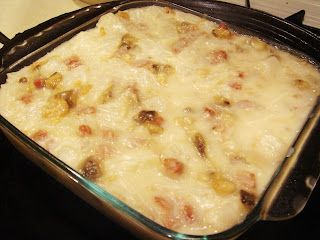
When cooled, run a knife along the edge of the cake to loosen sides. Invert to unmold and flip the cake right-side up onto a cutting board. You can serve the turnip cake as-is and sliced, or wrap the cake in plastic and refrigerate until ready to stir-fry.

To slice: Instead of cutting into wedges, slice the cake into rectangles 1 inch thick strips, then again into 3 inch long rectangles.

To stir-fry: Heat a medium to large skillet over medium heat. Add enough oil to barely cover the bottom and fry the cake in batches, about 3 to 5 minutes per side until golden brown. Serve immediately plain or with oyster sauce, soy sauce, or chili sauce.


I didn't have a 10" pan, so I steamed it in my 8x8 glass pan. I also steamed it in my wok. That's how I always steam my food. My mom has done the same thing for years.

Instead of oil, I sprayed the pan and pan fried that way. It tastes better after frying. I made this as one of the dishes for Thanksgiving this year. It was great. I tastes a lot like the ones we get at the restaurants. We like to dip it in oyster sauce.

Spinach Stuffed Chicken

Made by: Cathy

Happy Black Friday!

So for Black Friday, we decided to sleep in. There weren't that many great deals this year. We ended up leaving the house around 2:30 to look around for deals. We went to a few stores and drooled over the HDTVs. It was making us go crazy! We ended up buying a new TV. We were in the market for one, and it was time we got one. We didn't get home until after 8pm.

Last night, we gave a lot of the leftovers away. We also ate some leftovers for lunch before leaving the house, so we didn't have too much left. My sister made stuffed mushrooms. I defrosted the spinach in the microwave for her, but in the midst of craziness, we both forgot about the spinach in the microwave. I noticed it in the end when I put a bowl of cranberry sauce in there to heat up. I also forgot to make a rice casserole dish with chicken. I already defrosted the chicken the night before in the fridge.

So, chicken and spinach it was for dinner tonight. Here it is, spinach stuffed chicken. This was also made on my George Foreman grill.


Ingredients:
4 chicken breast tenderloins
1 10oz box frozen leaf spinach, defrosted
15 ritz crackers
1 teaspoon minced garlic
1 tablespoon grated parmesan cheese
1/2 teaspoon red pepper flakes
salt
pepper

Directions:
1. Place chicken in a plastic bag. Using the flat side of a meat tenderizer, pound the chicken until is is flat. Season with salt and pepper.
2. In a small food processor, grind the cracker into fine crumbs.
3. Spray a nonstick pan with cooking spray. On medium heat, saute the spinach for 2-3 minutes. Add the cracker crumbs, red pepper flakes, garlic, cheese and salt to taste. Mix well until combined, about 3 minutes.
4. Divide the spinach mixture evenly for each piece of chicken. Spread the spinach on the chicken. Wrap and stick a toothpick through to keep it together. Repeat with remaining chicken.
5. Grill on the George foreman for 4-5 minutes.


I only had 3 pieces of chicken, so I had a lot of spinach in each piece of chicken. It was a pretty simple dinner, but still tasted good.

Thursday, November 27, 2008

New York Cheesecake with Strawberry Topping

Adapted from: Recipezaar
Made by: Cathy
Also for: Local Eats

A couple of months ago, my cousins bought an Italian cheesecake for someones birthday. As we took a bite into it, it clearly wasn't as good as a classic New York Cheesecake. I told them I will make them a cheesecake to show them what a REAL cheesecake is!

Ingredients:

For the crust:
1 1/4 cups graham cracker crumbs (this is one package from a 4 pack of graham crackers)
4 tablespoons butter, melted or softened
1 tablespoon sugar

For the filling:
4 8oz packages cream cheese
2 eggs
1 cup (8oz) sour cream
1 cup sugar
1 teaspoon vanilla

For the topping:
1 pint fresh strawberries, or 1 bag frozen
1/3 cup sugar
1 teaspoon vanilla

Directions:
1. Preheat oven to 450°.
2. To make the crust, mix graham crackers crumbs, butter, and sugar in bowl.
3. Press mixture in bottom of a 9 inch springform pan. Refrigerate while you prepare the filling.


4. In mixing bowl, beat cream cheese and sugar for 2 minutes.
5. Add eggs and vanilla to mixture and mix until well blended.
6. Then stir or fold in sour cream.


7. Pour mixture in crust filled pan. Lightly tap the pan on the table to even out the batter. Smooth out with the back of a spoon or a spatula.
8. Bake for 10 minutes at 450°, then reduce to 200° and continue to bake for 45 minutes.
9. Turn off the oven, open the door slightly, and leave in oven for at least 2 hours.
10. Transfer pan to refrigerator and chill for 4 hours or overnight.

Topping recipe adapted from here:
1. Combine all ingredients and cook for 5 minutes under medium heat, stir well.
2. Using a masher or a fork, mash up about 2/3 of the strawberries.
3. Continue to cook on medium-low heat for 5-10 minutes, stirring well.
4. Refrigerate with the cheesecake until ready to serve.


The sides of the cake have already loosened from the pan since the night before. It has a nice indentation to put the topping. The cake is also firm to the touch.


Here is the finished piece with the fruit on top.


It's a work of art! It was very tasty. I had rave reviews, and the best part - it was the first cheesecake I've ever made!

Rave of the Day: Pie Crust Shield

For Thanksgiving, I made an extra pie for my sister-in-law to trade. I recently got a pie crust shield as part of my bank points redemption.

I got the Mrs. Anderson's 10-Inch Pie Crust Shield. I think it works wonders. I made 2 sweet potato pies at the same time. One was made with the pie crust shield and one with foil. In both instances, the foil and shield were removed 15 minutes before the pie was done.

This is the outcome:


The one on the left was made with foil on the crust, the right with the pie crust shield.
Here is a close up of the crusts. I got more even results with the shield. It's also much easier to work with than foil.


I usually don't make 2 pies at one time, but for the price, I think it's a good idea to have an extra.

Macadamia Nut Crusted Mahi Mahi

Adapted from: Recipezaar
Made by: Cathy

In the midst of cooking for Thanksgiving, we still needed to eat dinner. We had some frozen mahi mahi we bought in bulk from BJs. Mahi Mahi is a pretty good fish. It doesn't smell, it has a nice texture, and it tastes good.

I remember seeing a recipe for macadamia nut crust fish before. I wanted to try it out. I had the nuts on hand because I bought that in bulk at Amazon.

I used my George Foreman grill for this.


Ingredients:
2 mahi mahi filets
2 tablespoons flour
1 teaspoon salt
1 teaspoon red pepper flakes
1/2 cup macadamia nuts
1/4 cup sweetened coconut flakes
1 egg
1 tablespoon milk


Directions:
1. In a small food processor, grind together nuts and coconut flakes. Pour into a bowl, set aside.
2. In a small bowl, combine flour, salt, and red pepper flakes. Set aside.
3. Whisk together egg and milk.
4. Dip in this order: flour, egg, nuts. Coat evenly.
5. Grill for 4 minutes on the George Foreman grill.

The recipe posted is adjusted from the recipe I used to minimize waste. I used up all the nuts, but there was still egg (I used 2) and flour left (I used 1/4 cup). This recipe should work.

I liked the taste. It had a nice golden crust. I think it could use a little more salt. It totally reminded both Gary and I of Hawaii.

Wednesday, November 26, 2008

White Chocolate Walnut Gingerbread Blondies

Adapted from: Peanut Butter and Julie
Made by: Cathy

A couple of months ago, I bought white chocolate and macadamia nuts in bulk from amazon. I'm almost done with nuts, but I still have an overwhelming amount of white chocolate. I needed to use it up, so I started looking up recipes white chocolate. Actually, they sort of have a way of finding me. It's the holidays, so many people are using white chocolate in their recipes. I saw this on Tastespotting.com.

Please ignore my ugly yellow kitchen. :)


Ingredients:
2 3/4 cups flour
1 1/4 teaspoons baking soda
1 teaspoon salt
1 1/4 teaspoons ground cinnamon
1 1/4 teaspoons ground ginger
1/4 teaspoon ground cloves
10 oz. (2 1/2 sticks) unsalted butter, softened
1 1/4 cups light brown sugar, packed
1/2 cup sugar
3 large eggs
1 1/2 teaspoons vanilla extract
1/3 cup molasses
10 ounces coarsely chopped white chocolate (I used a 12oz bag of white chocolate chips)
1 1/2 cups coarsely chopped, lightly toasted walnuts (I didn't toast them)

Directions:
1. Preheat the oven to 350° F. Spray a rimmed half-sheet pan (17X12 inches) with nonstick cooking spray. Line the bottom with parchment paper and spray the parchment.
2. In a medium bowl, whisk together the flour, baking soda, salt, cinnamon, ginger, and cloves. Set aside.
3. In the bowl of an electric mixer fitted with the paddle attachment, beat the butter and both sugars on medium-high speed until light and fluffy, 5 minutes. Add the eggs, 1 at a time, beating well after each addition and scraping down the sides of the bowl as necessary. Beat in the vanilla and molasses until combined. Gradually add the flour mixture to the butter mixture, beating until just combined. Mix in the white chocolate and walnuts.


4. Spread the batter into the prepared pan and bake until set and the edges are golden, 22-25 minutes. Let the bars cool completely in a pan on a wire rack. Cut into squares or your desired shape.


These were amazing! The batter was pretty thick. I had to spread it out on the pan, and it was sticking everywhere. I'm so used to cookies and cakes where I just pour and leave it alone. This was worth the extra effort (not too much effort, I'm just exaggerating). They're just a little harder than cake.

I switched the order of the original recipe because I like to prepare the dry ingredients before starting up my mixer.

Honey Molasses Chicken Wings

Made by: Cathy

This is a slight variation of the chicken wings my dad taught me to make. It's pretty easy even Gary can make it. It usually doesn't turn out the same every time. I try to change it up each time I make it. This is how I made it this time.

Sorry for the blurry picture. For some odd reason, I couldn't take any clear pictures of this dish!


Ingredients:
3 tablespoon oil
1 teaspoon minced garlic
1 lb chicken wings, tips removed
2 tablespoons soy sauce
2 tablespoons honey
2 tablespoons molasses
1 tablespoon sugar
half cup cold water

Directions:
1. In a hot wok, add the oil. Add garlic and saute for a few seconds.
2. Add in chicken wings. Saute for a couple of minutes. Add soy sauce, honey, molasses, and sugar. Continue to saute for a few minutes.
3. Add the water, cover and let cook for another 10 minutes.
4. Transfer to a plate along with the liquid.

If there is not liquid left, it's ok. It tastes even better when all the sugar is caramelized into the wings.

Tuesday, November 25, 2008

Watercress Soup

Made by: Cathy

Watercress soup has been one of my favorite soups growing up. It's fairly easy to make and is good for you. There are 2 ways to make this: simmer for hours with dates, meat, dried goji berries; or make a quick soup where the watercress is still actually edible. I like the latter, Gary likes the former. I was making it, so I did it my way.


Ingredients:
~3 quarts water
2 big bunches watercress
1 filet swai or catfish (you can also use fishballs, pork, chicken, or sliced beef)
salt
white pepper

Directions:
1. Bring a pot of water to a boil. Reduce temperature to medium, add watercress to the pot. Cook for about 20-30 minutes.
2. Add the meat and continue to cook for another 10-15 minutes.
3. Add the salt and pepper to taste. Reduce to a simmer for another 5-10 minutes until the desired tenderness of the watercress.

It's a great quick weeknight soup that can be made fairly quickly.

Easy Grilled Sesame Ginger Salmon

Recipe from: Lawry's
Made by: Cathy

This has got to be the easiest salmon recipe ever! I had some marinade in the fridge as well as some salmon we got from Trader Joe's. I went to the Lawry's site and used their recipe. I wouldn't call it a real recipe with only 2 ingredients though!


Ingredients:
1-1/4 cups Lawry's® Sesame Ginger Marinade With Mandarin Orange Juice
1-1/2 lbs. salmon fillets

Directions:
1. Pour 1 cup Lawry's® Sesame Ginger Marinade With Mandarin Orange Juice over salmon in a large non-aluminum baking dish or resealable plastic bag and turn to coat. Cover, or close bag, and marinate in refrigerator about 30 minutes. Remove salmon from Marinade, discarding Marinade.
2. Grill or broil salmon until fish flakes with a fork, brushing often with remaining marinade and turning once.

I used my George Foreman grill and grilled it for 3 minutes! That's right, 3 minutes! Record time for dinner on the table. Whoo hoo!

Ladyfingers

Adapted from: All Recipes
Made by: Cathy

My sister was making tiramisu for Thanksgiving, so I told her I had a recipe for ladyfingers and I could make it for her. They're pretty hard to find in the stores, so might as well make something from scratch that tastes better than store bought.

The original recipe was for 48 servings, but it has all weird measurements for the ingredients. I changed it to 36 servings and it worked perfectly. I didn't get 36 cookies though, I only got 24. I guess I made them a little bigger and there was some batter left in the piping bag.

Ingredients:
3 eggs, separated
1/2 cup white sugar
2/3 cup all-purpose flour
1/2 teaspoon baking powder


Directions:
1. Preheat oven to 400 degrees F (205 degrees C). Line two 17 x 12 inch baking sheets with baking parchment. Fit large pastry bag with a plain 1/2 inch round tube.
2. Place egg whites in bowl and beat on high until soft peaks start to form. Slowly add 2 tablespoons of the sugar and continue beating until stiff and glossy. In another bowl beat egg yolks and remaining sugar. Whip until thick and very pale in color.
3. Sift flour and baking powder together on a sheet of wax paper. Fold half the egg whites into the egg yolk mixture. Fold in flour, and then add the remaining egg whites.


Transfer mixture to pastry bag and pipe out onto prepared baking sheet. Bake 8 minutes.


I made 2 batches. The first batch I made was only 24 cookies. They were also a little flat:


So, I added more baking powder for the second batch. I also whipped the egg whites a little longer, and didn't pipe the batter. I spooned the mixture onto silicone sheets.


Make sure they're totally cooled before peeling off the sheets. The cookies are fairly sticky. Although the cookies didn't look like fingers at all, the flavor was very good.

Monday, November 24, 2008

Rave of the Day: Progressive Grater Set

I wanted to make a carrot cake, but I didn't have a box grater. All I had was a microplane and that would give me mushy carrots. I looked at a few stores for box graters, but I couldn't believe the prices. $15-$20??? I didn't think I would use it much, so I wanted something a little cheaper.

I went to Century 21 to look at the kitchen stuff. Their stuff is usually a little cheaper. I saw the Progressive Grater Set, and it looked pretty interesting. For less than $10, I got 3 different grating sizes and a slicer. It all came in a handy plastic container that doubles as a measuring cup so I was able to see how much more I needed to grate. The downside is that it's white, and the carrots I grated stained it a little bit (but carrots stain everything). It would also have been nice to also have a hand guard, so I can grate close without fear of cutting my fingers. But that doesn't come with a box grater either so I'm fine with that. I ended up using the one that came with my mandoline slicer.

My other raves:

Anchor Hocking Presence Cake Dome Set
I used it to bring my carrot cake over to my sister's place. I love the fact that it converts into a punch bowl when inverted upside down. It is a bit heavy, so it's better off to just use it at home. I probably won't transport it again because of its weight and the fact that it's glass, and I'm a klutz.

Cuisinart Chef's Classic Nonstick Bakeware 9-Inch Round Cake Pan
I used this to bake the carrot cake. It's durable, heavy duty, and it doesn't warp. I coated it with nonstick baking spray and it didn't stick at all! It cleaned up with minimal effort, just as I like.

Sunday, November 23, 2008

Carrot Cake

Adapted from: All Recipes
Made by: Cathy

I'm not much of a cake person, but carrot cake is one of my favorites. I made this for my sister's Lunar birthday. I adapted the recipe from Allrecipes.com based on one of the reviews. One of the users consolidated all the reviews and came up with her own recipe.

I had rave reviews for this cake. Gary liked it and he told me he didn't like carrot cake. The ones he's had before were dry and didn't taste good. My BIL thought it was something store bought (yes!). My family thought it was great, and they usually hate sweets. They did say the frosting was sweet, but again, the DO hate sweets.


Ingredients:
4 eggs
1 1/4 cups vegetable oil
1 cup white sugar
1 cup brown sugar
3 teaspoons vanilla extract
1 cup crushed pineapple, drained (I forgot to add this)
2 cups all-purpose flour
2 teaspoons baking soda
2 teaspoons baking powder
1/2 teaspoon salt
3 teaspoons ground cinnamon
1/4 teaspoon nutmeg
3 cups grated carrots
1 cup chopped pecans (I omitted)

For the Frosting:
1/2 cup butter, softened
8 ounces cream cheese, softened
3 cups confectioners' sugar
1 teaspoon vanilla extract
1 cup chopped pecans (I omitted)

Directions:
1. Preheat oven to 350 degrees F (175 degrees C). Grease and flour 2 round 9" cake pans.
2. Grate 6-7 medium carrots to make 3 cups. Set aside.
3. In a small bowl combine flour, baking soda, baking powder, salt, cinnamon, and nutmeg. Set aside.
4. In a large bowl, beat together eggs, oil, sugars, vanilla, and pineapple. Mix in dry ingredients. Stir in carrots. Fold in pecans if desired. Pour equal amounts into prepared pans.
5. Bake in the preheated oven for 35 to 40 minutes, or until a toothpick inserted into the center of the cake comes out clean. Let cool in pan for 10 minutes, then turn out onto a wire rack and cool completely.


To Make Frosting:
1. In a medium bowl, combine butter, cream cheese, confectioners' sugar and 1 teaspoon vanilla. Beat until the mixture is smooth and creamy. Stir in chopped pecans. Frost the cooled cake.

I added 2 cups of confectioner's sugar initially to taste. I then added more sugar by the half cup to my desired sweetness.


In my excitement to eat my first ever carrot cake, I forgot to take a picture of the cut piece. It was so good.

Next time, I'm going to try it with the crushed pineapple to see how it tastes. I'm also going to try cupcakes.

Monday, November 17, 2008

Crockpot Chicken Congee

Made by: Cathy

So with the carcass (I know, sounds gross) of the chicken, I made congee (aka rice porridge) in my crockpot overnight. I woke up with the apartment smelling like yummy congee goodness. I couldn't get back to sleep!

It was a great way to another meal to get out of the whole chicken I made last night. I took it to work and ate it with toast. Gary took it to work for lunch. I took some leftover chicken for lunch.


Ingredients:
1 1/4 cup rice, washed well
about 3 quarts water
1 chicken carcass
a couple of chicken pieces
1 dried scallop
salt an pepper to taste

Directions:
1. In a small bowl, soak the dried scallop with warm water for 30-60 minutes.
2. Using the crockpot insert, wash the rice in cold water (about 2-3 passes). Fill the pot with water (I had about 2 inches from the top before I put the carcass in).
3. Drain and squeeze out extra water from the scallops and add to the pot. Place the carcass and chicken bits in the pot.
4. Add salt and pepper to taste. I only added salt because the chicken was already seasoned.
5. Set on low for 7-8 hours, or until desired consistency. Do not mix before it's done, otherwise it will stick to the pot.
6. Remove the carcass from the pot. Skim the fat or excess liquid off the top as needed. Mix well and serve.


Looks gross, I know, but it tastes good. I have a 4 qt pot, so adjust the recipe and time accordingly.

If you can't find dried scallops, you can omit. I think it adds a nice seafoody flavor. You can also do this with a turkey carcass. My mom made it many times after Thanksgiving.

Roasted Chicken with Vegetables

Made by: Cathy
Also for: November Tasty Tools

So, I cleaned out my pantry this weekend, and threw out a couple of things that were expired. It wasn't much, but it was enough to make me realize I was throwing money in the trash. So this week, I wanted to eat out of the pantry using things we had already (I can't believe I have 6 cans of creamed corn!).

We went out and bought a whole 6lb chicken and a bag of celery instead of just a package of the chicken breast for one night. I like dark meat more anyway, that way we both eat what we want.
I was also watching Paula Deen from Food Network make turkey on Saturday. She said to keep the skin crispy, she pats the skin dry before she does anything to it. No wonder all the chicken I make never gets crispy! But I don't eat the skin anyway.


Ingredients:
nonstick spray
5 thick carrots, peeled and cut into big chunks
3-4 stalks celery, cut into big pieces
3-4 potatoes, peeled and cut into big chunks
1 whole roasting chicken (I used a 6lb bird)
1/2 stick butter (4 tablespoons), softened (3/11/09 ETA: can use olive oil instead)
salt and pepper to taste
dried thyme
dried rosemary

Directions:
1. Preheat oven to 350° F.
2. Spray the bottom of your roasting pan with nonstick spray.
3. Peel, slice, and cut up vegetables. Place on the bottom of the pan. Coat the veges with a layer of salt. Place the roasting rack on top of the vegetables.
4. Wash the chicken under running water. Pat dry with a paper towel.
5. If using the olive oil, mix the spices into a bowl with the olive oil. Rub mixture on to the bird under the skin and on the inside. Rub butter all over the chicken, then rub with salt, black pepper, thyme, and rosemary. Don't forget the inside, and massage well! I found it easier to stick my hand inside the carcass to massage the underside. I don't think I used the whole 4 tbsp of butter. I had a little left over.
6. Place the chicken breast side up on the rack.
7. Bake for about 2 hours (6 lb bird), or 25 min per lb, or until internal temperature reaches 180° F.

The chicken I bought came with a popper, so I knew when it was done. I checked in with it after about 1 and a half hours, then every 10 min or so.

I accidentally broke it's leg while I was massaging it (sorry!). The veges were a little burnt because I didn't cut them big enough. I think if you're going to roast it, it's best to get a 3lb one or so, so the veges aren't over done.

I had a lot of chicken left over, so this week will be a chicken week.

Saturday, November 8, 2008

Peanut Butter Filled Chocolate Cupcakes

Cupcake recipe from: Hershey's
Made by: Cathy

I wanted to experiment with other chocolate/pb combinations, so I wondered if a chocolate pb cupcake would work.

I used Hershey's "Perfectly Chocolate" Chocolate Cake recipe and filled with a peanut butter mixture.

Ingredients:

For the filling:
1 cup creamy peanut butter
1 cup confectioner's sugar

For the cupcakes:
2 cups sugar
1-3/4 cups all-purpose flour
3/4 cup HERSHEY'S Cocoa
1-1/2 teaspoons baking powder
1-1/2 teaspoons baking soda
1 teaspoon salt
2 eggs
1 cup milk
1/2 cup vegetable oil
2 teaspoons vanilla extract
1 cup boiling water

Directions:

For the filling:
1. Combine peanut butter and sugar and mix until it is dough like. Set aside.


For the cupcakes:
1. Heat oven to 350°F. Line muffin tin with cupcake liners.
2. Stir together sugar, flour, cocoa, baking powder, baking soda and salt in large bowl. Add eggs, milk, oil and vanilla; beat on medium speed of mixer 2 minutes. Stir in boiling water (batter will be thin).
3. Measure 2 tablespoons batter into the bottom of each cup.

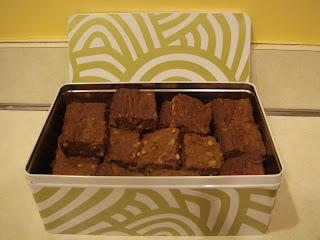
Place a dollop (about 1/2 tablespoon size) of peanut butter mixture into pan.


Measure another 2 tablespoons of batter to cover. Repeat with remaining cups.

4. Bake 20 to 25 minutes or until wooden pick inserted in center comes out clean. Cool 10 minutes; remove from pans to wire racks. Cool completely.


Makes 24 cupcakes.

The cupcake was good, but I guess I'm not too fond of chocolate cupcakes in general. I think next time, I might add slightly more sugar into the pb mixture, or add more pb into each cupcake.

Wednesday, November 5, 2008

Chicken Fried Rice

Made by: Cathy

Tonight's rice for dinner was a little dry. We were supposed to bring it to work along with the sauteed vegetables and chicken drumsticks we made. We figured the rice wouldn't reheat very well the next day, so with some leftovers and basic staples, we made a whole 'nother meal.


Ingredients:
3 eggs scrambled
3 tablespoons oil
4 cups cooked white rice (usually refrigerated overnight)
~3 tablespoons soy sauce
salt to taste
1 cup mixed frozen vegetables
1/2 cup frozen shelled edamame (soybeans)
1 cup cooked chopped or shredded chicken (I used 2 chicken drumsticks, cut up)

Directions:
1. In a pan, cook 3 scrambled eggs to about 3/4 done. Set aside.
2. In a wok or stir fry pan, add oil and let heat up. Add the rice and mix well. Add soy sauce and continue to stirfry.
3. Add vegetables and soybeans to the rice, and stirfry for 3-5 min until vegetables are no longer frozen. Add chicken and continue to mix for another 2 minutes.
4. In the last minute, add the scrambled eggs and stir well.

This is an easy meal to fix up when you have lots of leftovers to use up.

Banana Bread with Chocolate Chips

Adapted from: Kitchen Confit
Made by: Cathy

After my disaster with the pumpkin banana bread last weekend, I wasn't ready to give up. I still wanted bread, whether it were banana or pumpkin, I didn't care.

I had 2 ripe bananas, so I made banana bread.


Ingredients:
1/2 cup butter
1 cup sugar
1 1/2 cup mashed bananas (original reciped used 3 bananas, I only had 2 on hand)
2 eggs beaten
1 t. vanilla
2 cups flour
1 t. baking soda
1/2 t. salt
1/2 cup milk
pinch of nutmeg and cinnamon (optional)
1/2 cup walnuts or pecans (I used chocolate chips)

Directions:
1. Preheat oven to 325°. Butter and flour a loaf pan.

2.Combine the flour, baking soda, and salt in one bowl and set aside. Cream butter and sugar together. Add in the mashed bananas, eggs and vanilla. Add in the flour mixture. Add in the milk as well as the nutmeg, cinnamon and nuts it needed.

3.Pour mixture into the prepared loaf pan. Bake for 1 to 1 1/2 hours. Remove from oven and let rest in the pan for 15 minutes. Then remove from pan and let fully cool on a rack.

To freeze - double wrap the loaf in aluminum foil and place in a zip lock plastic bag.


I baked for about 1 hr 20 min. and it was a bit overdone on the edges. It was probably done at 1 hr 10 min. It tasted good, but next time I will add the third banana for a better banana flavor.