Thursday, January 20, 2011

Vietnamese Coffee Ice Cream

 vietnamese coffee ice cream

Remember when I went to the Vietnamese restaurant when we went to Quincy? That was my first time trying Vietnamese coffee. Since then, I’ve been addicted…well not really, but I came to love it. My usual coffee addition is half and half, sometimes 1 packet of sugar in the raw. When I have extra sweetened condensed milk leftover from recipes like this one, I use it in my coffee, so it’s a win win for me!

As I tasted this ice cream for the first time, it reminded me of the coffee candy I used to eat at my grandmas. When we were kids, my grandma always had a bowl of candy which included the coffee candy, one of my faves!

Like authentic Vietnamese coffee, I brewed the coffee with my french press. If you don’t have one, I highly recommend one. It makes coffee just that much better, and less bitter. I’ve also used it for cold press coffee, which came out wonderfully without any bitterness at all.

This recipe called for just a little over a can of sweetened condensed milk. Although I would use the remaining sweetened condensed milk in future coffee cups, I think I will try this recipe using only one can of sweetened condensed milk. I wasn’t a fan of opening a second can to use about 1/4th of it. I didn’t measure the ingredients by weight. What I did first was pour the coffee into a large measuring cup, then added enough sweetened condensed milk to that to make 3 cups. Then added the half and half and pinch of coffee. Everything was done in the cup until it was time to pour it into the machine to churn.

Vietnamese Coffee Ice Cream
source: The Perfect Scoop

 printable recipe


ingredients:
1 1/2 cups (600 g) sweetened condensed milk
1 1/2 cups (375 ml) brewed espresso (or very strongly brewed coffee)
1/2 cup (125 ml) half and half
big pinch of finely ground dark roast coffee

directions:
Whisk together all the ingredients in a large measuring cup. Cover and chill the mixture in the fridge for a few hours. Pour contents into ice cream maker and freeze per your manufacturer’s instructions.

Makes about 1 quart.

Tuesday, January 18, 2011

My Twist on Sloppy Joes

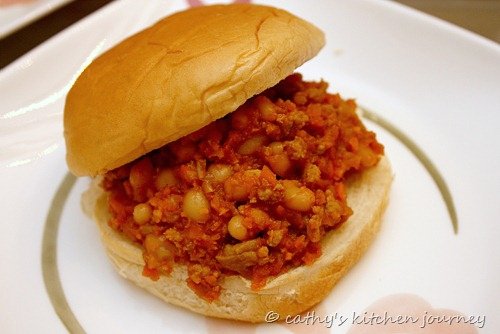
sloppy joes

When I was a kid, I don’t think I ever had a sloppy joe. If you think I was deprived, of course not. I grew  up eating homemade Chinese food. On rare occasions, we would order pizza. The only times I would probably see American food was during lunch at school. Even then, I wasn’t a fan of sloppy joes, beef patties, or stuff with ground meat. Heck, I was the one that ate only the jelly half of the pb and j sandwiches, but I digress.

The other day, I saw an episode of Throwdown with Bobby Flay, and it featured sloppy joes. After I saw it, I really wanted a sloppy joe, but I remembered I’ve never really had one. His recipe was a bit too complicated, and I decided to make one up, my way. It was my way to incorporate vegetables and other stuff Gary wouldn’t otherwise eat.  I originally wanted to use kidney beans, but I didn’t have any in the pantry. I ended up using small white beans, which worked out very well.

Sloppy Joes with Beans
a Cathy original!

 printable recipe


ingredients:
2 TBSP canola oil
1/2 lb ground turkey
1 small onion, quartered
3 cloves garlic
2 carrots, peeled and cut into 2 inch pieces
2 stalks celery, cut into 2 inch pieces
1 (15 oz) can small white beans, drained and rinsed
1 TBSP tomato paste
3/4 cup honey bbq sauce
1 TBSP chili powder

directions:
In a food processor, add in onion, garlic, carrots, and celery and grind for about 5-7 seconds, or until all the pieces are uniform. Or, you can dice them up into small bits. Drain and rinse beans.

In a hot pan on medium high heat, add in oil. Add in ground turkey, and cook until no longer pink.

Add vegetables and beans to the pan. Cook for about 5 minutes, stirring occasionally. Add in tomato paste and barbeque sauce. Stir to coat thoroughly. Add in chili powder to taste. Stir to coat evenly and let cook for another minute or 2.

Scoop onto burger buns and serve.

Makes 4 sandwiches.

Friday, January 7, 2011

Butternut Potato Soup

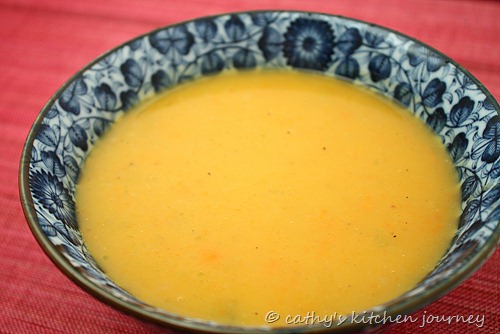
butternut potato soup

Every once in  a while I would pick up a butternut squash from BJ’s. It’s usually pretty expensive from the supermarket, even when on sale, so I normally wouldn’t get it there. I was thinking about making a butternut squash soup because I’ve had it in the past and really liked it.

Usually it does contain heavy cream or some kind of dairy, so I tried to find one that didn’t, but would still be creamy. I didn’t really find one I liked, so I decided to wing it. I was initially going to add a little bit of cornstarch or flour to thicken, but Gary suggested using potatoes instead. I thought it would work, so I added that in. It worked pretty well, and since we’re both huge fans of potatoes, it tasted very good as well.

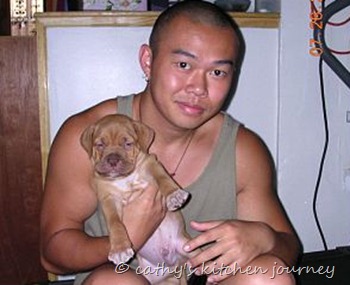
One of my fellow food bloggers is also on a mission for soup recipes. Branny will be donating $1 to the ASPCA for every soup recipe she receives for her Charity Souper Bowl. This post is dedicated to Gary’s dog, Humphrey. This was him way back in 2004 when we got him.

   h3 0525081935-01

He was so tiny….he’s probably around 120lbs now and still thinks he’s a little puppy! And look how much Gary has changed over the years too! He has hair!

Butternut Potato Soup

 printable recipe


ingredients:
1 medium butternut squash (about 3 lbs)
2 TBSP Earth Balance butter (or regular butter)
1 onion, diced
2 carrots, diced
2 stalks celery, diced
2 potatoes, diced
4 cups chicken stock (or sub vegetable stock for vegan)
nutmeg
salt and pepper to taste

directions:
Preheat oven to 400° F. Line a shallow baking sheet with foil. Spray with cooking spray. Cut the butternut squash in half lengthwise and scoop out seeds. Place the squash flat side down on the foil lined sheet and roast in oven for about 30 minutes or until fork tender.

Meanwhile, dice up onion, carrots, celery, and potatoes. In a dutch oven on medium heat, melt the butter, then add in diced vegetables and allow to cook until tender, about 10 minutes.

Remove squash from oven. Using a spoon, scoop out the flesh, then discard the skin. Add squash to pot and stir. Add in chicken stock, stir, cover and bring to a boil.

Using an immersion blender, blend until desired consistency. Add a dash of nutmeg, and salt and pepper to taste.

Makes about 4-6 servings, about 2 quarts of soup.

Wednesday, January 5, 2011

Pumpkin Cupcakes with Cream Cheese Frosting

pumpkin cupcakes with cream cheese
After making the pumpkin bars, I still had 3/4 cup pumpkin left. I was going to try to attempt scones again, but then I came across this recipe for cupcakes. This was perfect, since I was in a cake mood anyway and I had cream cheese to use up.

The original recipe yielded 32 cupcakes, but I halved the recipe and ended up with 18.  I did use buttermilk powder and water instead of actual buttermilk. I found that the batter was nice and fluffy from the use of the cake flour and buttermilk powder. Also, since I didn’t have any more unsalted butter left, I used salted butter, but forgot to reduce the amount of the salt. It didn’t make a big difference at all. To top it off, I used my favorite cream cheese recipe. It’s not too sweet to my family’s tastes, and it’s a good ratio of butter and cream cheese.

I didn’t quit have enough frosting to frost all 18 cupcakes based on the amount of frosting from the picture. I was able to frost 14. Next time, each cupcake will get slight less frosting on them so all of them will have some!

Pumpkin Cupcakes with Cream Cheese Frosting
adapted from: Martha Stewart’s Cupcakes

printable recipe

ingredients:2 cups cake flour, sifted
1/2 tsp baking soda
2 tsp baking powder
1/2 tsp kosher salt
1 tsp ground cinnamon
1/2 TBSP ground ginger
1/2 tsp ground nutmeg
1/8 tsp ground cloves
1/2 cup unsalted butter, softened
1 1/4 cups packed light brown sugar
2 large eggs
1/2 cup buttermilk
3/4 cup pumpkin puree

for the frosting:
1/4 cup butter, softened
4 oz cream cheese, softened
1/2 tsp vanilla extract
1 cup confectioner’s sugar

directions:Preheat oven to 350° F. Line 2 muffin trays with 18 paper liners. In a medium bowl sift together dry ingredients: flour, baking soda, baking powder, salt and spices. Set aside.

In an electric mixer on medium-high speed, cream butter and brown sugar until pale and fluffy. Beat in eggs one at a time until each one is fully incorporated. Reduce speed to low and add the flour mixture in three batches, alternating with the buttermilk. Beat until just combined, then add pumpkin and beat until just combined.

Using a 1/4 cup ice cream scoop, scoop and fill the lined cups. Bake in preheated oven for 15-18 minutes, rotating halfway through. Cupcakes are done when a toothpick inserted in the center comes out with little or no crumbs. Allow to cool in the pan on wire racks for 10 minutes before transferring to wire racks to cool completely.

for the frosting:
Beat butter and cream cheese until light and fluffy, then beat in vanilla. Gradually add powdered sugar and beat for 5 minutes or until fluffy.
Attach your favorite tip into a piping bag, or cut the corner of a ziploc bag and pipe onto cupcakes from the outside in. Alternatively, you can scoop and spread the frosting with an offset spatula.
Makes 18 cupcakes.

Monday, January 3, 2011

Coconut Chocolate Chip Pancakes

 coconut chocolate chip pancakes

Gary was so excited when I made this! He actually woke up saying “Pancakes!” I bet he was dreaming about this all night too! He loved this more than I did of course, since he loves coconut so much.

I have a love/hate relationship with coconut. I swear I’m not a coconut fan, but there’s no shortage of my favorite recipes filled with coconut on this blog. Gary, however, is a huge fan of coconut, whether it is the flakes or milk. His favorite ice creams are made with coconut milk. I guess my hate relationship with coconut is the smell. Sometimes, the smell is really off putting to me. It reminds me of the days when I was a teenager in the crowded, hot subway cars heading to school. Many of the old women on the train used a coconut oil based hair product that DID NOT mix well with heat and sweat!

So, when I popped open the can of coconut and scooped out the coconut oil for this recipe, I took a walk down memory lane…somewhere I didn’t want to go. I really wanted to like this recipe, so I kept on going through it. Luckily, once the pancakes cooked, there were no more remnants of the smell  that I despise so much. Since most of my favorite coconut recipes involve chocolate, I decided to add chocolate chips to the pancakes. This was a great decision on my part! It tasted much better with the chocolate, and what’s wrong with chocolate for breakfast?

I used unsweetened coconut flakes for this. I recommend using the unsweetened, but if you can’t find it, I would probably omit the sugar altogether. The chocolate addition also adds a little bit of sweetness, as does the maple syrup.

Coconut Chocolate Chip Pancakes
adapted from: about.com

 printable recipe


ingredients:
1 (14 oz) can coconut milk
1/2 cup unsweetened shredded coconut
2 eggs
1 1/2 TBSP white sugar
2 Tbsp. coconut oil OR butter, melted
1 tsp. coconut flavoring (optional) (I did not use)
1 cup all-purpose flour
3 tsp. baking powder
1/2 tsp. salt
1/2 cup semi sweet chocolate chips

directions:
In a medium-size mixing bowl, combine the can of coconut milk with the shredded coconut. Set aside.

In a small bowl, melt butter in the microwave. In another bowl, whisk the eggs. Add the sugar then melted butter to the eggs and whisk again until light and fluffy.

Add the egg mixture to the coconut milk mixture, stirring well to combine. Also add the coconut flavoring (if using).

In a large mixing bowl, stir together the flour, baking powder, and salt. Add the wet coconut-egg mixture to the dry flour mixture, stirring well to combine.

On a preheated griddle, scoop out 1/4 cup batter with a ladle. Pour batter on the griddle. Use the back of the ladle to spread the batter. When the surface around is covered with bubbles, add a few chocolate chips on each pancake, flip and cook the other side. Transfer pancakes to a plate, cover to keep warm. Continue to cook the remaining batter until it’s all used up. Serve with maple syrup.

Makes about 12 pancakes.